HW/OS2011. 8. 3. 10:23

----------------------------------------------------
# tar  cvf  /tmp/etc.tar   /etc            <-- 디렉토리 묶기
# tar  tvf  /tmp/etc.tar                   <-- 묶은 내용 보기
# tar  xvf  /tmp/etc.tar                  <-- 묶은것 풀기
# compress  /tmp/etc.tar               <-- 압축하기 ( .Z 로 압축)
# uncompress  /tmp/etc.tar.Z           <-- 압축풀기
# zcat  /tmp/etc.tar.Z | tar  xf  -         <-- 한번에 풀기

# jar cvf  /tmp/etc.jar  /etc              <-- 압축과 동시에 파일 묶기
# jar tvf  /tmp/etc.jar                    <-- 파일 내용 확인
# jar xvf  /tmp/etc.jar                   <-- 압축 해제와 동시에 파일 풀기

# gzip  /tmp/etc.tar                     <-- 압축하기 ( .gz 로 압축)
# gzip  -d  /tmp/etc.tar.gz              <-- 압축풀기
# gzip -dc  /tmp/etc.tar.gz | tar xf  -    <-- 한번에 풀기
# zip  -r  etc.zip   /etc                 <-- zip 으로 압축
# unzip  etc.zip                        <-- zip 파일 풀기

# bzip2  -z  /tmp/etc.tar                <-- 압축하기
# bzip2  -d  /tmp/etc.tar.bz2            <-- 압축 풀기

# #gunzip top-3.6.1-sol10-sparc-local.gz  <--- 압축 풀기

% bzip2 는 위에 열거한 압축 명령 중에서 압축율이 높음.


EIS CD안의 8_Recommended.tar.bz2파일만 수동설치시
# bzip2 -cd 8_Recommeded.tar.bz2 | tar xvf -

# cpio idmv < xxx.cpio
# unzip xxx.gz


# gzip -d Disk1.cpio.gz   으로 푸시고
# cpio -idmv < Disk1.cpio  으로 하면 archive가 해제됩니다
Posted by [TheWon]
HW/OS2011. 8. 2. 18:19

정보 화일들

/etc/passwd ->> 사용자 정보

/etc/shadow ->> 계정 암호

/etc/group    ->> 그룹 정보

사용자 이름  규칙

* 중복 되지안됨.

* 영문자, 숫자 가능

* 첫글자를 제외 (-) 하이픈 가능

* 이름에 공백과 기호 가능 

* 첫글자는 영문

* 적어도 하나의 소문자를 포함

* 최소 길이 2자, 최대 8자

패스워드
솔라리스 1.x 나 SUNOS 4.x 버전에는 /etc/passwd 에 실제 패스 워드가 저장 되었으나

솔라리스 2.x 로 바뀌면서 /etc/shadow  에 패스워드가 저장되는 방식으로 변경됐다 . 
ex > #cat /etc/passwd

root:x:Super-User:/bin/ksh

두번째 필드 x 는 암호 필드로 /etc/shadow에 암호 값이 대치 되어 있다.

UID
0 ~ 2,147,483,647  사이의 유일 정수가 가능하며 일반 사용자에게 100 ~ 60,000 사이의 UID 를 사용한다. 솔라리스 버전에 따라  응용 프로그램들이 그 이상의 UID 는 인식을 못할수도 있다.

기본그룹  (GID)
UID 와 같으며 0은 예약 되어 있다.  기본은 10(staff) 이다.

홈디렉토리 
일반적으로 솔라리스 2.x 에서 /export/home 하위 디렉토리를 사용자의 홈디렉토리로 지정한다.

로그인 쉘
솔라리스 제공 쉘은 6가지 이나 본인은 콘쉘을 사용한다.
==========================================================

사용자 관리 명령어 (useradd(사용자추가) usermod(정보변경) userdel(사용자삭제),

                            groupadd(그룹추가) groupmod(그룹정보변경)groupdel(그룹삭제)

1. useradd (사용자추가)
많이 사용되는 형식(2가지)

#useradd -g 10 -m -d /export/home/testuser -s /bin/ksh testuser

#useradd -u 1000 -g 10 -m -d /export/home/testuser -s /bin/ksh testuser

#useradd -c 'System Admin' -d /export/home/NEWID -m -s /bin/bash NEWID
( additonal profile options
    -P 'Primary Administrator,Network Management,Postgres Administration'


#passwd testuser
 
 * 사용자는 최소 1개의 그룹에 가입해야 한다.

2. usermod (사용자 정보 변경)
많이 사용되는 형태 (2가지)

# usermod -m -d /user/testuser -s /bin/ksh testuser

# usermod -u 1004 -g 14 testuser

3. userdel (사용자삭제)
#userdel -r username    -r옵션은 사용자의 홈디렉토리를 삭제한다.

4. gruopadd (그룹추가)
ex>groupadd -g 101 class01   -g옵션은 새로운 GID 를 입력할떄 사용한다.

                                          -o옵션은 새로 추가되는 그룹이 기존과 같은 GID 를 갖도록
                                              할려고  사용한다.

5. gruopmod(그룹 정보 변경)
ex> groupmod -g 103 class01 (class01 그룹의 GID 를 103으로 변경하라)

6. groupdel (그룹삭제)
#groupdel class03  -->class03 그룹을 삭제하라

Posted by [TheWon]
Virtualization2011. 8. 1. 20:11

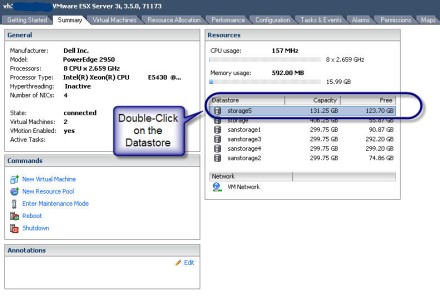
VMware 서버를 설치할 경우 ESX 서버 Volume 경로에 ISO 이미지 파일을 업로드 하면 서버 설치를 빠르게 할수 있다.

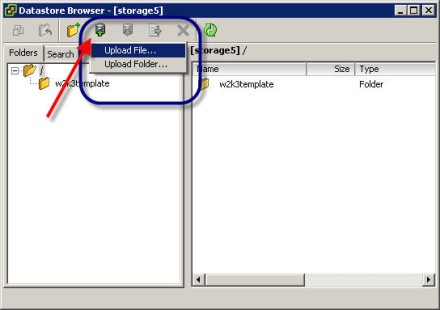
1. 해당 DataStore 볼륨 더블클릭

datastore browser example: uploading Fedora Core ISO file on VMware Server 3i


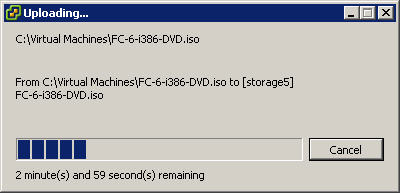
2. Upload File 선택하여 ISO 이미지 파일을 업로드

VMware ESX Server 3i article: using datastore browser screenshot


Fedora Core Linux Install DVD ISO file upload to VMware ESX 3i


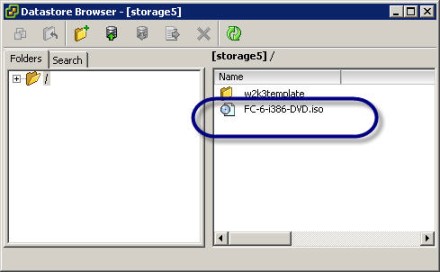
3. 전송후 ISO 이미지 확인


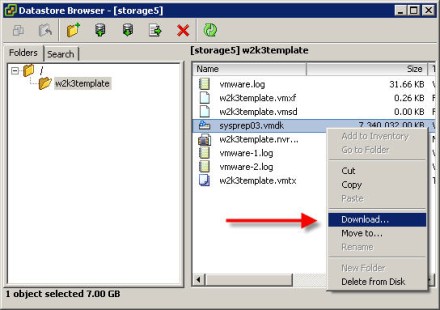
4. Download도 가능하다

download files from VMware datastore browser 
Posted by [TheWon]
Virtualization2011. 8. 1. 20:07
The firewall built into ESX server uses iptables, the very commonly used Linux firewall. However to create the rules another esxcfg tool is used, which is esxcfg-firewall.

To list the services currently controlled by the firewall:
esxcfg-firewall -s

To list the firewall rules:
esxcfg-firewall -q [servicename]
esxcfg-firewall -q

Enable a service:
esxcfg-firewall -e [servicename]
esxcfg-firewall -e sshClient

Disable a service:
esxcfg-firewall -d [servicename]
esxcfg-firewall -d sshClient

Open a port:
esxcfg-firewall -o 465,tcp,out,out-smtps

Close a port:
esxcfg-firewall -c 465,tcp,out


Command Options:
/usr/sbin/esxcfg-firewall
esxcfg-firewall 
-q|--query                                      Lists current settings.
-q|--query Lists setting for the
specified service.
-q|--query incoming|outgoing                    Lists setting for non-required
incoming/outgoing ports.
-s|--services                                   Lists known services.
-l|--load                                       Loads current settings.
-r|--resetDefaults                              Resets all options to defaults
-e|--enableService Allows specified service
through the firewall.
-d|--disableService Blocks specified service
-o|--openPort         Opens a port.
-c|--closePort             Closes a port previously opened
via --openPort.
--blockIncoming                              Block all non-required incoming
ports  (default value).
--blockOutgoing                              Block all non-required outgoing
ports (default value).
--allowIncoming                              Allow all incoming ports.
--allowOutgoing                              Allow all outgoing ports.
-h|--help                                       Show this message.


NOTE: For changes to show in VC/VI client restart mgmt-vmware.
/etc/init.d/mgmt-vmware restart
Posted by [TheWon]
Storage2011. 8. 1. 09:16

1. BBWC ( Bettery Backed Write-Cache )
     - 전원 차단시 Array Write-Cache에 저장된 Data를 보존, 전원 연결시 Data 자동복구됨
     - Bettery 방전전까지 전원 연결이 되지 않으면 Data Loss 발생
     - Storage 의 경우 Bettery 교체 시기및 완충이 되지 않을경우 Auto Shutdown 될수 있음

2. FBWC ( Flash Backed Write-Cache )
    - BBWC의 단점을 보완 적용된 기술
    - Power-Cap에 의해 Write-Cache에 저장된 Data를 Flash에 저장 보관, 전원 연결시 Data 자동복구는 동일
    - Bettery가 없으므로 주기적으로 BBU(Bettery)를 교체할 필요없음, 이에 따른 유지보수 시간및 비용발생 無
    - 성능은 BBWC, FBWC 동일하다고봄.. 
Posted by [TheWon]